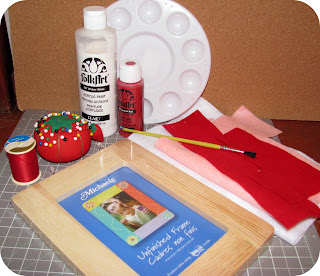
Supplies I used:
1. wooden frame (from Michael's)
2. felt in any colors you like
3. red paint, white paint
4. small paint brush and sponge brush and
something to put paint in.
5. thread to match felt
6. pins to hold roses together before sewing
7. glue-gun
7. glue-gun
First I painted the frame red, using the sponge brush.
(I started the project several days in advance
before I started taking pictures. So, the paint had a lot
of time to dry.) Don't forget the sides of the frame!
of time to dry.) Don't forget the sides of the frame!
if you used the same kind of frame I did. I used a
clothespin to hold it, so I wouldn't get paint
all over my hands. {I did anyway.} You don't
have to necessarily paint the part under the
clothespin, since it will be inside the peg-hole.
clothespin to hold it, so I wouldn't get paint
all over my hands. {I did anyway.} You don't
have to necessarily paint the part under the
clothespin, since it will be inside the peg-hole.
with water to make it go on more smoothly. Then,
using quick strokes, brush the white on with your
small brush, to make the frame look weathered.
{Around the edges and on the inside edge where the frame
would get the most wear.} If you mess up, you can
just cover it up with another coat of red.
While the paint is drying, you can make your
roses. Cut your felt into a strip about 6 inches long
and 1-2 inches wide. Depending on how large you want
the rose to be. Then fold your felt strip in half
lengthwise. (hotdog style!)
Start at one end and roll the felt around into a coil.
On the larger roses, you can twist the felt
periodically to make extra petals.
When you get to the end, use a pin to hold
the rose together in a few places. Then, thread
your needle with the thread that matches the
felt the best.
When you get to the end, use a pin to hold
the rose together in a few places. Then, thread
your needle with the thread that matches the
felt the best.
{I doubled my thread to make sure it didn't break
through the felt easily when tugged.}
After pushing the needle through the rose
a few times in different locations, tie off
the end of your thread and remove the pins.
Your rose is done!
After making several roses {if you plan to use more
than one.}, your paint should be dried. Using your
glue-gun, attach the roses in one corner of the frame.
Your frame is done! {Be sure to attach the dowel
in the back to help it stand up.} Stick in a picture
and add it to your Valentine's Day decorations!
{If you have any questions about this project
or anything else, feel free to email me!}


1 comment:
Hobby Lobby sounds like a delightful place. Your frames look lovely. Are you aware its snowing hearts here? You're really in the February spirit!
Post a Comment